Update
Hi everyone,
As suggested, I tore off the neck

- it wasn't going to work. I took my patterns and made fur pieces from them, slightly larger and made the cap for the head. This took some trial and error of course. In the end I did make a small mistake but I was able to adjust for it with the back part.
I made the jaw fur piece. Then I took measurements and got the circumference of the back of the end, front of the jaw area to make the sleeve. Out of this sleeve I cut a spot for the jaw and sewed it in. (This took about 3 tries with scraps to get it right).
That piece got sewn to the sides and back of the 'hood'. I did some of it while it was on the foam and some off, leaving the back unstitched in the center so I could shove the head back in, this I did and pinned it all up (nothing is glued yet).
I made a nose and pinned that on, it's some funky material glued on to a foam golf ball. Here's the pics as he stands now:
http://www.pixelmech.com/rev/pinned1.jpg
http://www.pixelmech.com/rev/pinned2.jpg
http://www.pixelmech.com/rev/pinned3.jpg
You can see where the back is still open, that's going to be a tricky sew. All the sewing was done by hand. I couldn't use a sewing machine because it left way too much of a thick edge around the stitch.
I'm going to do more finishing on the mouth probably, maybe like Dr. Teeth's bottom lip. I want to use ping pong balls for the eyes but I'm scared to cut into the head after getting the fur right! I'll make a practice piece first.
Comments are welcome. When I get some energy, I'll glue up the fur in some strategic places and move on to the body and arms.
Tom
 Welcome to the Muppet Central Forum!
 Back to the Rock Season 2
 Sesame Street Season 54
 The Muppets Mayhem premieres
 Bear arrives on Disney+
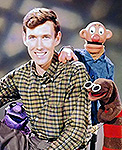 Sam and Friends Book
 Actually, those first puppets of yours look pretty good, I think.